오드로이드 개인서버 구축 #6 공유기 DDNS로 고정 IP 대신 사용하기
React Native #4 UI 개발하기
2018-11-15
Explanation
오늘은 React Native로 UI를 만들어 보려 합니다. 처음에 ‘React Native가 React를 알면 도움이 된다’라는 이야기를 듣긴 했는데요, 막상 직접 사용해보니 깜짝..
정말 그냥 React를 import해서 사용하니까, 정말 친숙하게 다가갈 수 있었답니다.
역시 일단은 예제 소스를 만들어서 깃헙에 올렸습니다.
예제 코드: https://github.com/falsy/blog-post-example/tree/master/react-native-example
간단하게는 지난 글에서 설치한 디렉토리에서 ./App.js와 ./src/ 디렉토리만 복붙해서 보셔도 될 거 같아요.
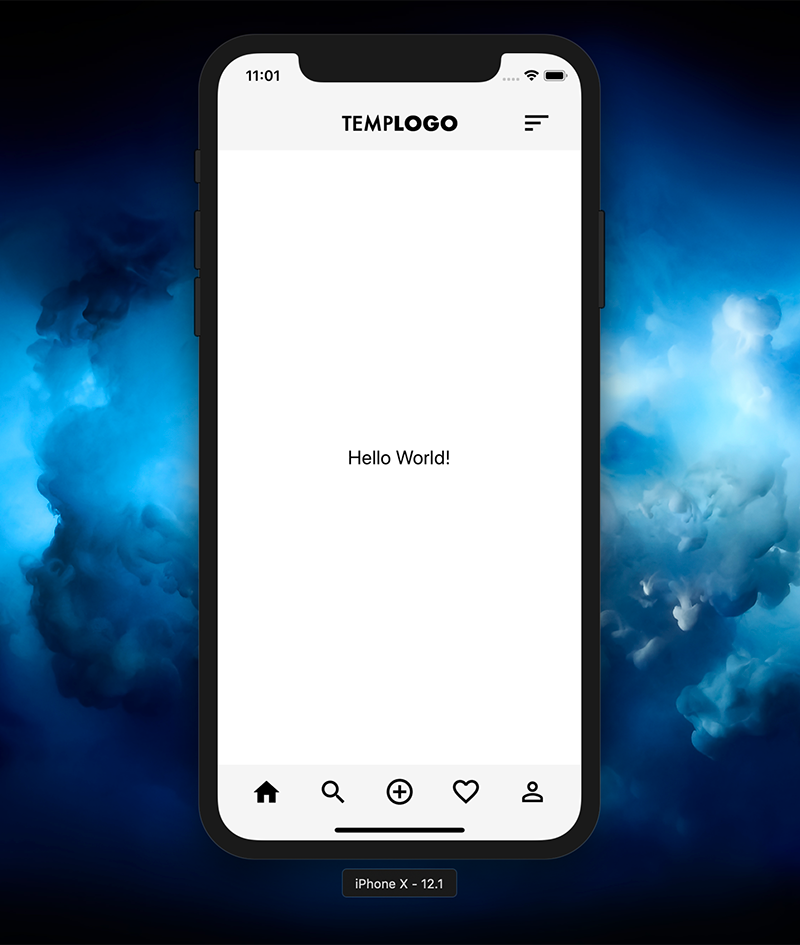
우선 시작하기전에 만들어 본 UI를 실행하면 아래와 같은 UI가 출력된답니다.

뭐 되는건 없지만 나름 그럴싸하죠?ㅎ
일단 기본적으로 React가 익숙하시다면 구조가 전체적으로 아주 친숙하게 받아 들여진답니다. 똑같이 state와 props를 사용하고 필요한 라이브러리들도 npm을 통해서 불러와서 사용할 수 있고요. (redux도 똑같이 사용하실 수 있습니다.) 약간의 차이라면 리액트 네이티브는 DOM을 사용하지 않는 점? 그리고 css를 따로 사용하지 않는 점? 정도인거 같아요.
간략히 코드를 보자면
|
1 2 3 4 5 6 7 8 9 10 11 12 13 14 15 16 17 18 19 20 21 22 23 24 25 26 27 28 29 30 31 32 33 34 35 36 37 38 39 40 41 42 43 44 45 46 |
// ./src/views/Dashboard.js import React, {Component} from 'react'; import {StyleSheet, Image, Text, View} from 'react-native'; import DashboardFooter from '../components/DashboardFooter'; import DashboardHeader from '../components/DashboardHeader'; class Dashboard extends Component { constructor(props) { super(props); this.state ={ text: 'Hello World!' }; } render() { return ( <View style={styles.wrap}> <DashboardHeader /> <View style={styles.content}> <Text style={styles.welcome}>{this.state.text}</Text> </View> <DashboardFooter /> </View> ); } } const styles = StyleSheet.create({ wrap: { flex: 1 }, content: { flex: 1, justifyContent: 'center', alignItems: 'center', backgroundColor: '#fff', }, welcome: { fontSize: 20, textAlign: 'center', color: '#000' } }); export default Dashboard |
DOM 엘리먼트를 대신해서 ‘react-native’에서 View, Text, Image 뭐 이런 컴포넌트들을 사용할 수 있어요. DOM 엘리먼트와 비교하자면 View는 div의 느낌이고 Text는 p의 느낌 Image는 img의 느낌으로 사용할 수 있습니다. 스타일도 위 예 같은 경우에는 StyleSheet.create() 통해서 스타일을 정의하고 호출 했는데요.
|
1 |
<View style={{flex: 1}}></View> |
이렇게도 사용할 수 있답니다. 그리고 스타일 요소들은 아주아주 css와 유사해서 따로 공부하지 않아도 그대로 사용하실 수 있습니다.
그러면 여기에서 알아두면 좋은 스타일 요소가 ‘flex’ 인거 같아요. 대략 이야기하면 절대값으로 지정되지 않은 영역에 대한 상대값으로 이야기할 수 있을 거 같아요. 위 예를 들자면 content의 flex: 1의 값은 너비는 100%를 의미하고 위 코드만으로는 알 수 없겠지만, DashboardHeader 컴포넌트 안에서 가지고 있는 100px과 DashboardFooter 컴포넌트 안에서 가지고 있는 78px를 제외한 높이의 영역을 가지게 됩니다. 그리고 만약에
|
1 2 3 4 5 6 |
<View style={styles.content}> <Text style={styles.welcome}>{this.state.text}</Text> </View> <View style={styles.content}> <Text style={styles.welcome}>{this.state.text}</Text> </View> |
이렇게 flex: 1의 값을 가진 2개의 View가 나란히 위치하면 똑같이 너비 100%와 높이는 아까 이야기한 100px 78px 제외한 나머지 영역을 1:1 비율 나누어서 갖게 된답니다.
그리고 다음으로
|
1 2 3 4 5 6 7 8 9 10 11 12 13 14 15 16 17 18 19 20 21 22 23 24 25 26 27 28 29 30 31 32 33 34 35 36 37 38 39 40 41 42 43 44 45 46 47 48 49 50 51 52 53 54 55 56 57 58 59 60 61 62 63 64 65 66 67 68 69 70 71 72 73 74 75 76 77 78 |
// ./src/componets/DashboardFooter.js import React, {Component} from 'react'; import {StyleSheet, Image, Text, View} from 'react-native'; import SafeMargin from './SafeMargin'; class DashboardFooter extends Component { constructor(props) { super(props); this.state = {}; } componentDidMount() { } render() { return ( <View> <View style={styles.footer}> <SafeMargin /> <View style={styles.footerIcon}> <Image source={require('../imgs/home-icon.png')} style={{ width: 26, height: 24, }}/> </View> <View style={styles.footerIcon}> <Image source={require('../imgs/search-icon.png')} style={{ width: 24, height: 24, }}/> </View> <View style={styles.footerIcon}> <Image source={require('../imgs/plus-icon.png')} style={{ width: 28, height: 28, }}/> </View> <View style={styles.footerIcon}> <Image source={require('../imgs/heart-icon.png')} style={{ width: 28, height: 25, }}/> </View> <View style={styles.footerIcon}> <Image source={require('../imgs/my-icon.png')} style={{ width: 22, height: 22, }}/> </View> <SafeMargin /> </View> <View style={styles.footerIndicator}></View> </View> ); } } const styles = StyleSheet.create({ footer: { height: 56, flexDirection: 'row', justifyContent: 'center', alignItems: 'center', backgroundColor: '#f5f5f5', }, footerIcon: { flex: 1, alignItems: 'center', }, footerIndicator: { height: 22, backgroundColor: '#f5f5f5', } }); export default DashboardFooter |
여기서 확인할 수 있는 부분은 Image는 저렇게 상대 경로로 require()를 source 속성으로 호출할 수 있다는 것과,
|
1 2 3 4 5 |
footer: { height: 56, flexDirection: 'row', alignItems: 'center', ... |
스타일 flexDirection: ‘row’ 로 하위 요소를 병렬? 정렬할 수 있고 alignItems: ‘center’ 속성으로 가운데 정렬을 할 수 있다 정도가 있는거 같습니다.
더 많은 스타일 속성들이 있겠지만 그것들은 조금만 검색해봐도 너무 잘 나와 있어서요. 아주 간단히 몇가지만 직접 해보면 어렵지 않게 UI를 쉽게 구성할 수 있습니다~